- Update Profile
- One-Click Login
- SFTP Credentials
- ZipWP Projects
- Permanent vs Temporary Site
- Configure PHP Version
- White Labelling
- Change Account Timezone
- Cloudfare White Labelling
- Clone Sites
- Custom Username & Password
- Create Sites Using Search Bar
- Disable Email Notifications
- WordPress Multisite
- Blueprint URL Parameters
- Collect Blueprint User Details
- How to access Experimental Features?
How to Create a WordPress Multisite with ZipWP
ZipWP lets you create WordPress Multisites. A multisite is a network of sites sharing a single WordPress installation. Each website in a multisite network shares the same WordPress core files and plugins, but they can have their own themes, content, and users.
For instance, an e-commerce company may want to operate multiple online stores targeting different markets, product categories, or customer segments. With WordPress multisite, they can easily set up and manage separate storefronts for each niche within a single WordPress installation.
So, instead of managing multiple e-commerce platforms separately, WordPress multisite allows the company to oversee all its stores from one central dashboard.
In this article, we’ll show how easily you can create and set up multisites within ZipWp.
Creating WordPress Multisites Using ZipWp
Follow these steps to create your own multisite in ZipWP:
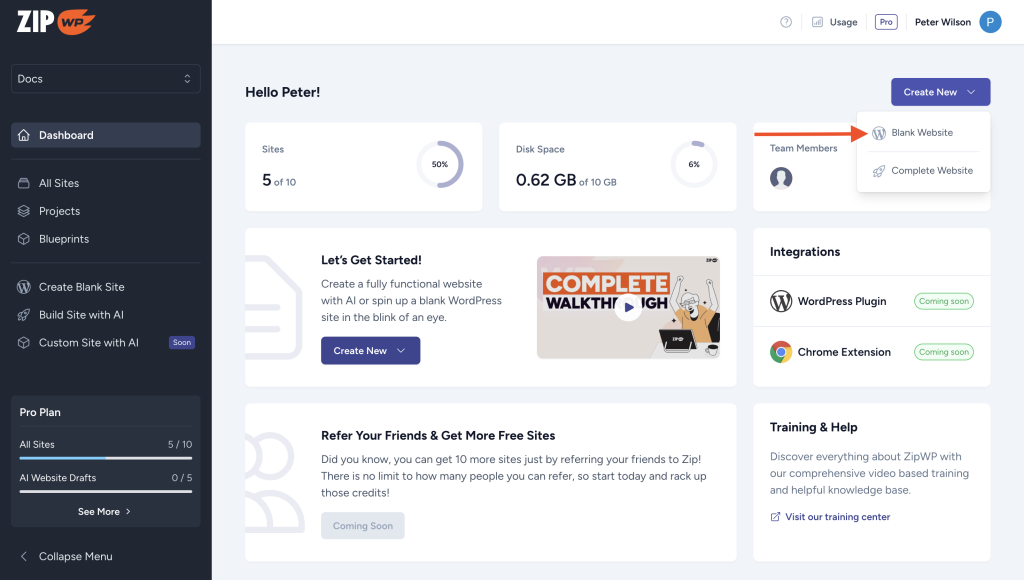
- Navigate to your ZipWP dashboard and create a new blank website.

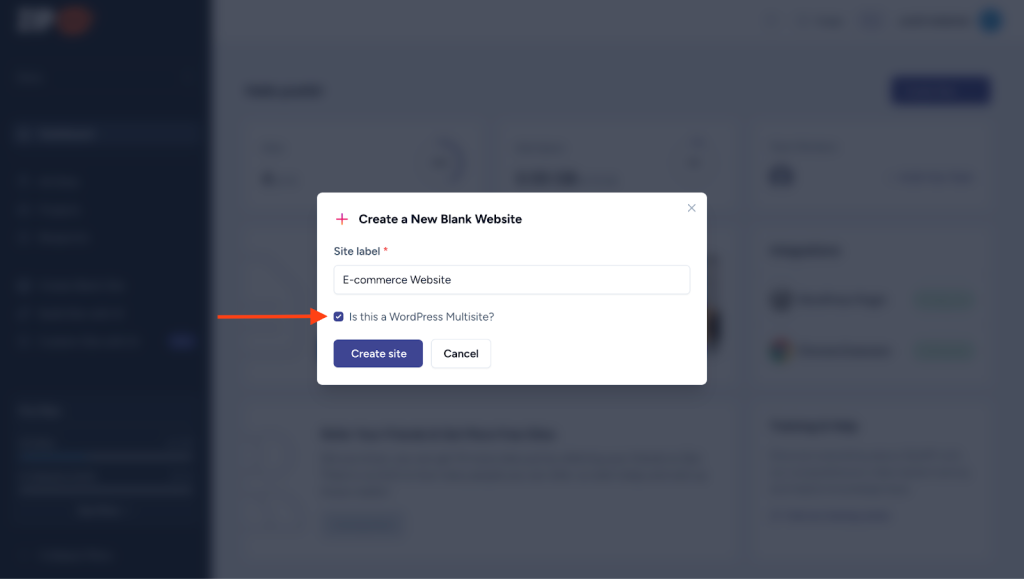
- Provide a name for your website and enable this checkbox to create a multisite network.

ZipWP will create a new WordPress multisite with you as a super-admin/network admin. This role has the highest level of access and authority over the entire Multisite network.
Setting Up WordPress Multisites
Note: ZipWP does not currently support mapped domains on WordPress Multisite setups. This means that while you can create multiple sites within your network, you cannot map custom domain names to these individual subsites at this time.
You can find all the network-level settings at My Sites > Network Admin. Access this area whenever you want to manage all the websites connected to your network.

Note: These options will only be visible to you as a super-admin.
- To create a new site within your network, access My Sites > Network Admin > Sites.

- Here you will find all of your subsites including your primary one. Click on the Add New Site button to create a new WordPress site.

- Choose the website’s URL, title, and admin email here. If you opt for a completely new email, a new user will be created using that email, and the login details will be sent to the new email address.

- You can also access these sites directly from the My Sites dropdown menu.

When it comes to plugins, you can only install and delete them through the Network Admin section. Here’s how you can manage plugins:
- Navigate to My Sites > Network Admin > Plugins.

- You can install any plugin directly from this section.

- You can activate your preferred plugins for the entire network by choosing the Network Activate option from the “Installed Plugins” section. This ensures that the plugins are activated on all your sub-sites simultaneously.

- This is how the same section appears on one of your sub-sites.

- Only network admins can deactivate or delete these plugins for the entire network.

These are just a few examples of what ZipWP multisites can help you achieve. Create a multisite now to open up even more possibilities!
And if you have any more questions, please contact our support team. They’re always here to lend a hand whenever you need it!
We don't respond to the article feedback, we use it to improve our support content.